
 In this article, I will provide an overview of the different things you can do to ensure you print high quality images every time and get the most out of your machine.
Follow These Tips to Print High Quality Images
Use High Quality Images
First things first, in order to print high quality images you must first be sending high quality images to your copier. Commercial copiers are powerful machines, but they’re not magic. They can only work with what you give them. For example, trying to blow up a thumbnail-size image to fit an entire page will result in the image coming out pixelated and blurry.
If you’re printing images from a digital camera you likely don’t have anything to worry about. Using images from the web is a whole other matter, because the resolution of those images can vary wildly. If you’re printing images from the web, and are not satisfied with the quality, check to make sure you’re using the highest resolution of that image you can find.
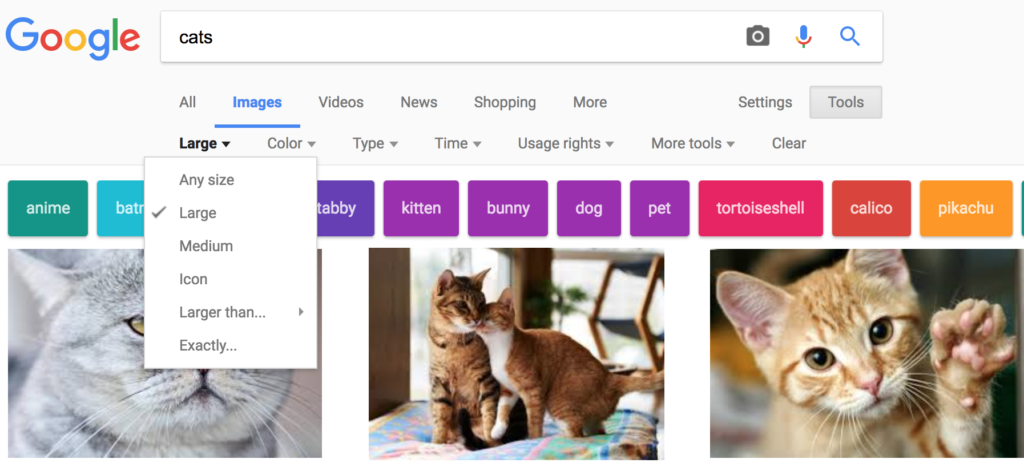
Here is a foolproof way to find high resolution images using Google Image Search. Search for the image you want, then look underneath the search bar for a drop down menu that says “Any Size.” Click on it, and change it to “Large.”
Here’s an example:
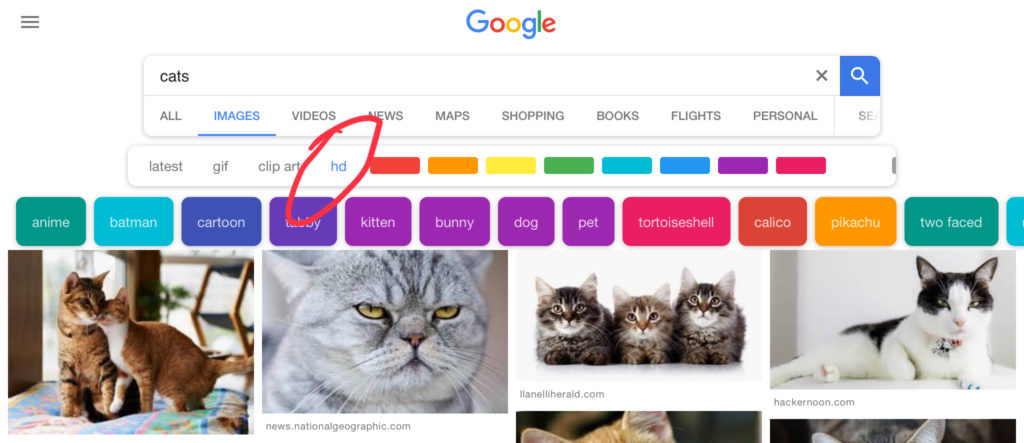
To find high quality images on a mobile device, follow the same steps but instead of the drop down menu tap on the option that says “HD.” Here’s another example:
If you’re positive that you’re using high resolution images, but are still not satisfied with the image quality, read on for further advice.
Adjust the DPI
When you send an image to print, you should see an option that will allow you to adjust the DPI (dots per inch). The greater the DPI, the higher quality images you will produce. So adjust the DPI until you’re satisfied with how your images look. Keep in mind though, printing at maximum DPI all the time will inevitably lead to your toner cartridges draining much faster.
Adjust the Colors
Speaking of toner cartridges, that leads me to my next point. When you’re sending an image to print you should see an option that will allow you to adjust the amount of colors you’re using. Color prints are created by mixing 4 different colors together— cyan, magenta, yellow, and black (also referred to as CMYK). Make sure you’re using as many colors as your machine will allow for.
Use Better Paper
The type of paper you use can have a big impact on the print quality. Using better paper will improve the quality of the images you’re printing. By “better” I mean using paper that is less porous, and more of a hard finish. That way the toner will stay on top, rather than getting sucked into the paper.
In Summary
To print high quality images you need to make sure you’re working with high quality images in the first place. Beyond that, it’s just a matter of adjusting a couple of settings and investing in paper that’s better suited for printing images. If you’re running into other problems that are affecting image quality, such as lines on the page appearing out of nowhere, please see my article on copier troubleshooting tips.